YOLOv3-Train
- 학습시 입력 값
- 기본 weight파일의 경우에는 [weight파일]에서 설치 가능
./darknet detector train [data파일명] [cfg파일명] [weight파일명]
- 만약 coco데이터와 동일하게 학습할 경우 (80개의 객체에 대해서 학습)
./darknet detector train cfg/coco.data cfg/yolov3.cfg darknet53.conv.74
- 기존 weights(YOLO에서 주어준 학습 데이터)를 사용하여 transfer learning을 하기 위해선
본인이 학습시킬 cfg파일의 max_batches값을 변경해주어야 한다. ( 해당 학습 데이터는 총 500200의 학습을 이미 했기 때문에 수정 안하고 학습을 진행하면 바로 학습이 종료된다. )
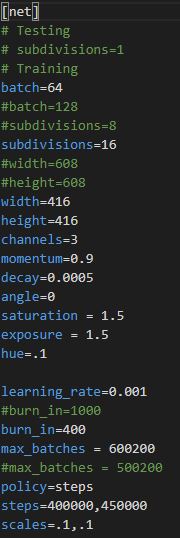
- 기존 max_batches값을 600200으로 수정하여 학습하기 위한 방법
./darknet detector train [data파일명] [cfg파일명] [이전에 학습된 weights 파일명 ]으로 학습 가능
- 기본 weight파일의 경우에는 [weight파일]에서 설치 가능
소스 부분
- 학습 부분에서 소스를 봐야 되는 클래스는 examples/darknet.c , detector.c , src/network.c , option_list.c , list.c , utils.c , parser.c , convolutional_layer.c , detector.c , image.c , matrix.c , image_opencv.cpp 와 같은 파일들을 확인하면 좋습니다.
- 소스 흐름도 ( train부분과 detection부분 )은 StarUML5.0을 통해서 확인할 수 있습니다.
여기서는 학습에서 가장 중요한 Anchor Boxes에 관련된 내용을 다룰 예정
- 소스 부분에서 yolo_layer.c클래스의 forward_yolo_layer함수를 확인하시면 좋습니다.
void forward_yolo_layer(const layer l, network net)// forward_yolo_layer() function
{ // 공부하기
  int i,j,b,t,n;
  memcpy(l.output, net.input, l.outputs*l.batch*sizeof(float));
#ifndef GPU
  for (b = 0; b < l.batch; ++b){
      for(n = 0; n < l.n; ++n){
          int index = entry_index(l, b, n*l.w*l.h, 0);
          activate_array(l.output + index, 2*l.w*l.h, LOGISTIC);
          index = entry_index(l, b, n*l.w*l.h, 4);
          activate_array(l.output + index, (1+l.classes)*l.w*l.h, LOGISTIC);
      }
  }
#endif
  memset(l.delta, 0, l.outputs * l.batch * sizeof(float));
  if(!net.train) return;
  float avg_iou = 0;
  float recall = 0;
  float recall75 = 0;
  float avg_cat = 0;
  float avg_obj = 0;
  float avg_anyobj = 0;
  int count = 0;
  int class_count = 0;
  *(l.cost) = 0;
  for (b = 0; b < l.batch; ++b) { // batch(4) grid접근 방식
      for (j = 0; j < l.h; ++j) { // height
          for (i = 0; i < l.w; ++i) { // width
              for (n = 0; n < l.n; ++n) { // anchor's number = 3
                  int box_index = entry_index(l, b, n*l.w*l.h + j*l.w + i, 0); // 몇번째 grid cell인가
                  //printf(" box_index = %d ",box_index);
                  // 학습하는 이미지의 각각의 이미지를 따로 가져옴. 한번에 4개의 이미지를 읽기 때문에 batch또한 0번부터 3번까지 나눠서 정보를 가져옴
                  // n*l.w*l.h + j*l.w + i == 이미지 RGB의 모든 값을 가지는 1차원 배열 정보
                  box pred = get_yolo_box(l.output, l.biases, l.mask[n], box_index, i, j, l.w, l.h, net.w, net.h, l.w*l.h);
                  //3개의 anchor box 확인
                  float best_iou = 0;
                  int best_t = 0;
                  for(t = 0; t < l.max_boxes; ++t){ // 모든 객체들에 대해서 iou값을 확인
                      box truth = float_to_box(net.truth + t*(4 + 1) + b*l.truths, 1); //  b = 4
                      if(!truth.x) break;// net.truth + t*(4 + 1) + b*l.truths 이것이 의미하는 것은?
                      float iou = box_iou(pred, truth); // 예측과 실측에 대한 iou값 계산
                      if (iou > best_iou) { // 최대의 iou값만 남긴다
                          best_iou = iou; // 가장 높은 iou값을 가진 객체의 값을 저장
                          best_t = t; // test_t = 무슨 객체인지를 알려줌 여기서 t = 0 이면
                          // person을 뜻함
                      }
                  }
                  //하나의 cell에 대해서 모든 객체 점수들을 종합하여 최대의 값을 파악
                  int obj_index = entry_index(l, b, n*l.w*l.h + j*l.w + i, 4); // 해당 grid cell 위치에서 objectness값 확인
                  // objectness score정보를 가져오기 위한 obj_index
                  avg_anyobj += l.output[obj_index];
                  // 전체 평균값에 obj_index값을 증감
                  l.delta[obj_index] = 0 - l.output[obj_index];
                  //best_iou가 0.7보다 작은 경우 l.output[obj_index]는 0에 가까운 값이기에 0 - 로 시작
                  //하지만 1보다 큰 경우에는 l.output이 1에 근사한 값이기 때문에 1 - 로 시작함
                  if (best_iou > l.ignore_thresh) { // best_iou > 0.7
                      //printf("111\n");
                      l.delta[obj_index] = 0;
                  }
                  if (best_iou > l.truth_thresh){ // best_iou > 1 예외처리 느낌으로 사용
                      //printf("222\n");
                      l.delta[obj_index] = 1 - l.output[obj_index]; // make l.delta = 0 ~ 1

                      int class = net.truth[best_t*(4 + 1) + b*l.truths + 4];
                      if (l.map) class = l.map[class];
                      int class_index = entry_index(l, b, n*l.w*l.h + j*l.w + i, 4 + 1);
                      delta_yolo_class(l.output, l.delta, class_index, class, l.classes, l.w*l.h, 0);
                      //현재 cell에서 가장 알맞은 anchor박스를 통하여
                      box truth = float_to_box(net.truth + best_t*(4 + 1) + b*l.truths, 1);
                      delta_yolo_box(truth, l.output, l.biases, l.mask[n], box_index, i, j, l.w, l.h, net.w, net.h, l.delta, (2-truth.w*truth.h), l.w*l.h);
                  }
              }
          }
      }
해당 부분까지가 각 grid cell에 접근하여 Anchor Box를 통하여 iou값을 얻어서 해당 iou값에 따라서 delta ( loss값 계산할 때 사용되는 변수 )에 feature map을 통하여 추출한 output값을 저장한다. 여기서 iou값이 0.7보다 작으면 0 - output (objectness값은 작아야 되기 때문에) 0.7보다 크면 1 - output (objectness값이 1에 가까워야 하기 때문)을 통하여 delta 값을 결정한다.
for(t = 0; t < l.max_boxes; ++t)
        {
            box truth = float_to_box(net.truth + t*(4 + 1) + b*l.truths, 1);
            //net->truth의 값은 train부분에서 get_next_batch()함수 [이미지에 대한 정보를 가져오는 작업]에서
            //실측값(ground truth)를 다음 구조체 변수에 저장한다.
            //해당 작업은 if(y) memcpy(y+j*d.y.cols, d.y.vals[index], d.y.cols*sizeof(float));
            //와 같은 if문에서 처리
            //net->truth = net->truths*net->batch
            if(!truth.x) break;
            float best_iou = 0;
            int best_n = 0;
            i = (truth.x * l.w);
            j = (truth.y * l.h);
            //i,j = 실측값 중심점 좌표 학습 이미지를 resizing 시켰기 때문에 위치 재조정
            box truth_shift = truth;
            truth_shift.x = truth_shift.y = 0;
            for(n = 0; n < l.total; ++n){
                box pred = {0};
                pred.w = l.biases[2*n]/net.w;
                pred.h = l.biases[2*n+1]/net.h;
                //pred.w,h = anchor box's w,h
                float iou = box_iou(pred, truth_shift);
                //truth_shift는 x,y는 0 w,h는 실측값에서 가져온다
                //실측값과 anchor box의 iou
                if (iou > best_iou){
                    best_iou = iou;
                    best_n = n;// 제일 잘 맞는 anchor박스를 검출
                }
            }
            //
            int mask_n = int_index(l.mask, best_n, l.n); // best_n = 0 ~ 8
            //모든 anchor박스에 하는 이유는 다른 yolo에서도 똑같이 해당 함수를 사용하지만
            //해당 l.mask의 값에 따라서 사용할 수 있는 anchor박스는 제한적
            //따라서 첫번째 yolo 레이어에서는 6,7,8 anchor box에 대해서만 사용 가능
            //printf("mask_n = %d, best_n = %d, l.n = %d\n",mask_n,best_n,l.n);
            /* 결과 예시
            utils.c 635 line
                mask_n = -1, best_n = 5, l.n = 3
                mask_n = -1, best_n = 5, l.n = 3
                mask_n = -1, best_n = 5, l.n = 3
                mask_n = -1, best_n = 3, l.n = 3
                mask_n = -1, best_n = 3, l.n = 3
                mask_n = -1, best_n = 7, l.n = 3
                mask_n = 1, best_n = 1, l.n = 3
                mask_n = -1, best_n = 5, l.n = 3
                mask_n = 1, best_n = 1, l.n = 3
                mask_n = -1, best_n = 5, l.n = 3
                mask_n = -1, best_n = 4, l.n = 3
              */
            if(mask_n >= 0){ // find something
                int box_index = entry_index(l, b, mask_n*l.w*l.h + j*l.w + i, 0);
                //b = batch 사진 한장
                float iou = delta_yolo_box(truth, l.output, l.biases, best_n, box_index, i, j, l.w, l.h, net.w, net.h, l.delta, (2-truth.w*truth.h), l.w*l.h);
                //(box truth, float *x, float *biases, int n, int index, int i, int j, int lw, int lh, int w, int h, float *delta, float scale, int stride)
                int obj_index = entry_index(l, b, mask_n*l.w*l.h + j*l.w + i, 4);
                avg_obj += l.output[obj_index];
                l.delta[obj_index] = 1 - l.output[obj_index];
                // 1 = 정답 - l.output[] = 예측한 값, truth의 확률
                int class = net.truth[t*(4 + 1) + b*l.truths + 4];
                if (l.map) class = l.map[class];
                int class_index = entry_index(l, b, mask_n*l.w*l.h + j*l.w + i, 4 + 1);
                delta_yolo_class(l.output, l.delta, class_index, class, l.classes, l.w*l.h, &avg_cat);
                ++count;
                ++class_count;
                if(iou > .5) recall += 1;
                if(iou > .75) recall75 += 1;
                avg_iou += iou;
            }
        }//end t iteration
    }//end first iteration
    //printf("l.outputs = %d , l.batch = %d\n",l.outputs,l.batch);
    *(l.cost) = pow(mag_array(l.delta, l.outputs * l.batch), 2); // 중요
    printf("(Yolo)Region %d Avg IOU: %f, Class: %f, Obj: %f, No Obj: %f, .5R: %f, .75R: %f,  count: %d\n", net.index, avg_iou/count, avg_cat/class_count, avg_obj/count, avg_anyobj/(l.w*l.h*l.n*l.batch), recall/count, recall75/count, count);
}//end forward_yolo_layer() function
하나의 이미지에 대해서 모든 pixel접근이 완료된 후 실제 라벨링된 위치 (ground truth)정보를 사용하여 학습 모델을 통해서 추출한 output과 실측값을 비교하여 loss를 검출하는 부분이다. 이를 통해서 MSE ( Mean Square Error)을 사용하여 0에 가깝도록 학습시키는 것을 반복한다.
- 위의 부분은 yolo layer에서 loss값을 얻기 위해 forward를 하는 작업이다. 학습 부분에 있어서 보다 다양한 함수들을 접근하여 처리합니다
- 모든 내용을 한번에 다루기에는 너무 양이 많기 때문에 추가적으로 보고 싶은 부분이 있다면
- 흐름도 부분은 StarUML5.0 을 통해서 확인하면 도움이 될 것이며
- 소스 부분은 Darknet을 복제하여 주석처리해놓은 것을 보면 도움이 될 것이라 판단 됩니다.